
PDF is short for Portable Document Format and it is a versatile file format for sharing documents online. For example, many contracts and documents are signed virtually and saved as PDFs because the format tends to be more secure.
PDF files have been around for over two decades now. There isn’t a single user who has not gone through these as they are ubiquitous. PDF files not only contain text, but they also have media such as audio and videos.
If you’re exchanging and creating PDFs with your peers or coworkers, chances are high you’ll need do some notation. Annotating PDFs refers to adding notes and important remarks to the PDF for other readers. It’s common during the development process, and may be required for you to sign or fill out a PDF as well.
Don’t worry if you don’t have much experience annotating like this on a computer. We’ll go over the easiest ways to annotate a PDF on Windows and Mac OS.
What Is an Annotation?
When you mark up text, you are in fact having a conversation with what you are reading. So, an annotation is important.
Annotation is a fancy word for "marking a sentence, paragraph, page or anything else." There are various markup tools you can use to annotate what you are reading: underline a sentence, use a highlighter, add a comment with an arrow, flag with a symbol, draw a shape around it, tag a Post-It note on it, etc.
Use the selection and the markup tools annotate the PDF. You can use type, sketch, draw, use shapes, add notes, sign, and change the format for all.
7 Best PDF Annotator Software for Mac and Windows Users
Creating or reading a PDF is simple enough, but if you want to edit or annotate a PDF without changing it to a different format (or disturbing its layout), you’ll need to have a dedicated PDF editor on hand.
Conventional PDF readers don’t make it easy to draw or write freehand onto documents.
PDF editors are a different beast than PDF readers or word processors. They’re designed to handle one specific format and perform a limited number of tasks within that format.
The ability to allow single or collaborative annotation and markup is paramount. Good PDF editors should offer helpful annotation tools like highlighting, sticky notes, comment boxes, message stamps (like “approved” or “confidential”), or even freehand notes.
Many – including Adobe’s own Acrobat Reader – make it easy to highlight text or add your signature.
1. Adobe Acrobat Reader DC
If there’s something you need to do to a PDF (and if you want to look right and stay secure), Adobe Acrobat is your best choice.
This is the industry standard for PDFs. Adobe makes it easy to create, edit, and sign PDFs (and track their activity) with its modern, intuitive interface.
The software is available for Windows and macOS systems, as iOS and Android apps, and as a Google Drive add-on.
2. Foxit Reader
Foxit PDF Reader allows you to annotate otherwise unmodifiable PDF files using its suite of drawing tools.
These drawing tools feature a variety of shapes, such as arrows, lines, rectangles, ovals, polygons and clouds, but it also offers a freehand Pencil Tool that allows you to draw or write whatever you desire.
If you mess up, don’t worry; Foxit PDF Reader also offers a Rubber Tool which allows you to erase marks made by the Pencil tool.
3. Drawboard
Drawboard PDF is now available for free through the Microsoft Store. Drawboard PDF can open, read, mark up, edit, write, annotate, ink, draw and save multiple large and complex PDF documents.
Millions of engineers, architects, lawyers, students and educators are already using Drawboard PDF every day for fast and collaborative PDF markup.
4. PDF XChange Viewer
The smallest, fastest, most feature-rich FREE PDF editor/viewer available! Create, View, Edit, Annotate, OCR and Digitally Sign PDF files plus much more....
PDF XChange Viewer has lots of features that are only available in paid versions of Acrobat or Foxit.
5. Xodo PDF Reader & Annotator
Xodo is one of many free PDF viewers. It supports annotations that will also work with other PDF viewers such as Adobe Acrobat Reader, and the app makes it easy to mark up documents using digital inking. Best of all, Xodo can save your digital signature for use across multiple documents.
Xodo works on Windows, Android, and ChromeOS, so no matter what you get you’ll have a free, excellent PDF annotation app.
6. OneNote
In the OneNote free note-taking application you can markup, highlight and tag the PDF document and it will be automatically saved to your OneNote Notebook. You can then print it, use it in a presentation, or share it via email and other apps.
Annotating PDFs in OneNote could be a good way to have students highlight parts of speech in a document that they share with you. It could also be a good way to draw attention to a particular passage in a text or make suggestions or improvement.
7. Xournal++
Xournal++ is a free handwriting notetaking software with PDF annotation support. which runs on Linux, macOS and Windows 10.
Xournal can be used to annotate PDF files, by loading the pages of a PDF file as backgrounds for a journal.
Best tablets with a stylus pen for annotating, Writing and Signing PDFs
If you’re going to mark up a PDF, you’ll want a good stylus that come with a tablet. These styli will help you create a clean signature and attractive annotations.
This is just comes down to what features you want and how much you’re willing to pay. Do you need a full OS? Or just something basic that can open PDFs and ink on them.
If marking up PDFs is something that you do a great deal of and a key part of your job, I would recommend getting the portable touch screen device ( such as ipad pro, surface pro, samsung galaxy tab.... ) you can find that supports the use of a highly-sensitive pen stylus.
Just open your document in PDF Reader, and you can begin writing on it with your favorite stylus or use a finger on a touch device.
If you already have a separate mac or pc and don’t need portability I’d recommend a cheaper option - USB drawing tablet.
All graphics tablets, with or without a display, support to write, sign name, comment, highlight on PDF like using a real pen on real paper.
The big time saver is the programmable buttons and dial that allow instant access to any menu feature you frequently use. It’s a huge time saver.
Digital pens are also a step above. it can be used as a mouse as well as a drawing tool. Angle and pressure sensitive as well as two programmable buttons on the pen (I use for single and double click selections).
The drawing board senses pressure so it is recommended to use the least amount of pressure from your hand while writing.
They can be a little unnatural to use at first, hopefully you’ll get used to it. They start cheap enough that you can see if you like them anyway.
One tip - whilst an A4 or larger surface feels like it ought to be a good idea, you end up moving your pen quite a lot and it gets tiring. Try smaller first.
Annotate PDF with Drawing tablet
Connecting a Drawing tablet & pen to your laptop or desktop allows you to write or draw electronically.
The pen tablet connects via USB or wireless. After downloading and installing the necessary driver you can use the pen and tablet to control your computer much like a computer mouse.
Then Use a PDF Annotator software to write, draw, or annotate prepared PDF slides.
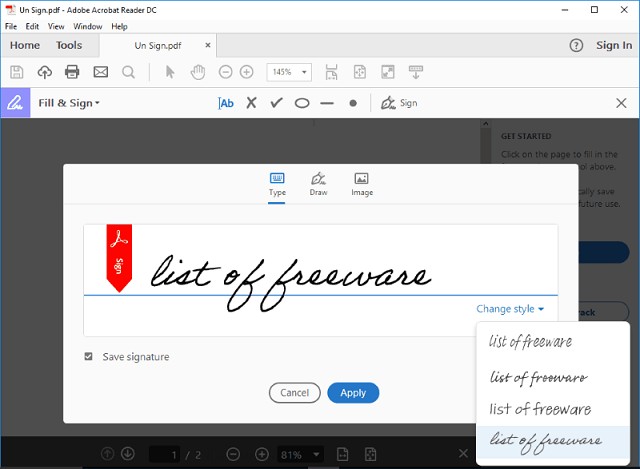
How to creat your digital signature on PDF file in Adobe Acrobat Reader DC
1. Open the Acrobat Reader DC and a PDF file that you want to sign your name.
2. Click ‘Tools’ and then find the item ‘Fill & Sign’ from the ‘Tools’ menu, open it.
3. Click the item ‘Sign’, then choose ‘Add Signature’.
4. Click ‘Draw’, then you can use stylus to draw. After finishing your signature, click ‘Apply’ to save it.
5. The signature can be placed anywhere in the PDF after saving it. For example, put the signature at the place that you want it there: choose ‘Sign’, click that place, then signature comes out.
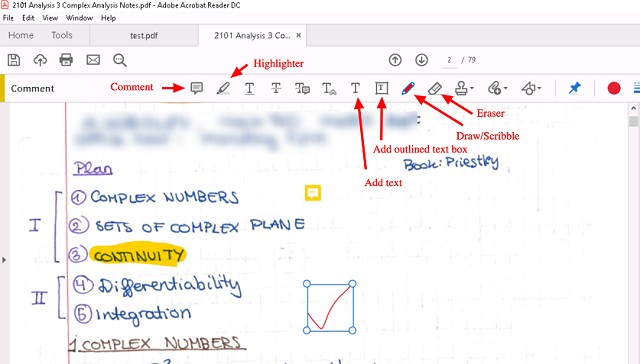
How to use graphic tablet to draw, handwrite, comment on or highlight PDF files in Adobe Acrobat Reader
1. Connect the tablet and open the Acrobat Reader DC software.
2. Click ‘Tools’ and then find the item ‘Comment’ from the ‘Tools’ menu, open it.
3. Click pen icon that named ‘Draw free form’ pen to draw. you can select a color and line thickness you want from the icon on the toolbar.
The ‘Draw free form’ option makes you can use the tablet pen to draw words freely on PDF files, just like to draw on a canvas.
The ‘Draw free form’ option also makes you can use the tablet pen to draw, line, circle or mark out the important content.
4. Move the cursor on the circled pen and click it. Then you can use the tablet pen to highlight the content you want.
Digital Drawing and Writing in Word, OneNote and PowerPoint with your drawing tablet
With the latest version of Office 365 come some pretty cool features.
In Microsoft Word , OneNote or Microsoft PowerPoint, head over to the Draw tab and simply pick your pen. Then start marking up the doc. An entire menu of options for the electronic pen will then be available in the ribbon.
Both programs also allow you to use Windows Ink to create math equations using a pen instead of a mouse or keyboard and in Word, you can embed a drawing canvas right into your Word doc. Save your doc, and you ink is saved too.
Best XP-Pen drawing tablets Recommendations for annotating pdfs
Several brands exist, XP-Pen are pretty decent too, and hit all budget levels including a small portable model.
XP-Pen is one of the leading graphic tablet manufacturers in the world.
Anything made by XP-Pen would be a good option. They are very highly regarded in the digital art community.
I would recommend the XP-Pen Star G640, I used this for marking up documents but also extensive photoshop use.
1. XP-Pen Star G430S / Star G640 / Star G640S
XP-Pen Star G430S / Star G640 / Star G640S art tablet is designed with slim and compact sized with an active area of 4x3 inches / 6x4 inches / 6.5x4 inches offering perfect creative space for limited desktop areas.It is easy to carry out and always ready for your creation whenever and wherever.
Battery-free Digital pen P01 features 8192 levels of pressure sensitivity,5080LPI pen resolution and virtually no lag, providing you ultimate precision and control.
The Star G640S has 6 buttons on the tablet that can be set to any art program shortcut keys. It supports Android and Chromebook devices, apart from your windows and mac os ( Star G430S / Star G640 only compatible with windows and mac os ).
With stylus and the tablet ,teachers and studernts can easily handwritten edit,diagram,do math,annotate on virtual whitebord in Zoom, Team and Xsplit while streaming or broadcasting.
It is compatible with Word, Powerpoint, OneNote and more.It is also perfect for taking notes ,jotting down ideas and business signature during web conferencing and remote working.
2. XP-Pen Deco Mini4 / Deco Mini7 / Mini7w
With 4x3 inches / 7x4 inches / 7x4 inches workspace, XP-Pen Deco Mini4 / Deco Mini7 / Deco Mini7w graphics tablet is compact and lightweight, which makes it convenient to draw and write outdoors.
The battery-free stylus P05D offers 8192 pressure levels and ±60° tilt recognition ( Deco Mini4 version doesn’t support this function ) for beginners to design and creat.
Built-In 2.4G high-speed wireless connectivity of Deco Mini7w tablet can reach to 10 meters transmission distance. which is more convenient for you to capture your creativity.
XP-Pen Deco Mini4 / Deco Mini7 / Mini7w pen tablet can be used on various operating system: Windows, Android, Linux , Chrome and Mac OS.
3. XP-Pen Deco Fun XS / S / L
Available in three sizes ( XS - 4.8× 3" / S - 6.3 × 4" / L - 10 × 6.27" ) and four colors ( Classic Black, Space Blue, Apple Green and Carmine Red ), XP-Pen Deco Fun offers more choices to users who pursue individuality.
The battery-free stylus is light and super-accurate which supports up to 8,192 levels of pressure, 60 degrees tilt sensitivity ( XS version not support this function) .
The Deco Fun graphic Tablet works well with Windows, Mac, Linux, Chrome OS and Android devices . Also compatible with all major digital art programs.
4. XP-Pen Artist 12 / Artist 12 Pro / Artist 12 2nd Gen
XP-Pen Artist 12 Pro / Artist 12 2nd Gen tablet features a stunning 11.6-inch full-laminated screen with Full HD 1080P resolution, letting you enjoy immersive viewing in great clarity and fine detail.
full-laminated screen ( Artist 12’s screen is non laminated ) reduces the parallax to the lowest so you can easily control the cursor where you expect to be.
90% NTSC color gamut of Artist 12 2nd Gen ( Artist 12 and Artist 12 Pro are 72% NTSC ) is excellent. which ensures the color of your artwork matching the color that you desire.
The battery-free stylus has a resolution of 5080 LPI and has 8192 levels of pressure sensitivity. There is a tilt support available in Stylus of Artist 12 Pro and Artist 12 2nd Gen tablets ( the stylus of artist 12 not support this function ).
The Stylus of Artist 12 2nd Gen come with new X3 chip has low activation force which allows the tablets to detect the slightest of touches from the pen. This feature alone massively improves the user experience.
Conclusion
Annotating is a key reading skill that enables you to actively and critically engage with text. Besides using it to comment on and capture your thoughts as you read.
annotation can also be used as an instructional tool with your students. For instance, you can use it for formative assessment purposes, for comprehension checks, to collect students feedback and many more.
There will be times that you have to markup a PDF, highlight specific text, or annotate something. Instead of searching for a dedicated PDF reader, you can perform all of that inside the Microsoft Edge web browser.
XP-Pen tablet does have the ability to write in Microsoft edge. To do this, select the drawing tool in Microsoft Edge and you’ll be able to write over any webpage.
Annotation with the drawing tablet was excellent, and it’s something that cannot be achieved with the typical computer peripherals or even smartphones.
For those who need to read and annotate many PDF documents everyday, the handwriting input device would do wonders and makes the process faster and easier.
Source Link: https://www.xp-pen.com/forum-2887.html
コメントをみる | 


If you are an illustrator who works digitally (like most these days) you have most likely been enticed by the idea of owning a tablet monitor. They allow you to actually draw, paint or vector on the actual screen you’re looking at, rather than dealing with the separation of pen and “paper” that comes with the use of the more primitive artist drawing tablet for pc options without a built-in screen. One obstacle that prevents most digital artists from acquiring a tablet monitor is a simple one: price.
For many artists and designers, the ultimate dream is to have a full-size Wacom Cintiq to draw, sketch and design on. But being arguably the best graphic tablets the market has to offer also means these heavyweight creative pen displays don’t come cheap; they’re usually within the reach of working designers who can offset the cost against tax, but for students and enthusiasts, they’re just a bit too rich.
Wacom held the monopoly on drawing tablet monitors for what has felt like a long time, but I’m personally very excited to introduce you to XP-PEN, a company that is currently making tablet monitors that stand up to the quality and ease of use of Wacom’s Cintiq at a fraction of the cost.
Most of the consumer reviews tell that the XP-Pen Artist 22 ( 2nd Generation ) 22-Inch Pen Display are high-quality product and it is also reasonably priced.
I’ve always owned small tablets and had been wanting to try a bigger one for a bit now, so Artist 22 (2nd Generation) looked just perfect to me.
The product arrived in a very short time, intact and perfectly packaged. After my few days with it, the results were quite impressive.
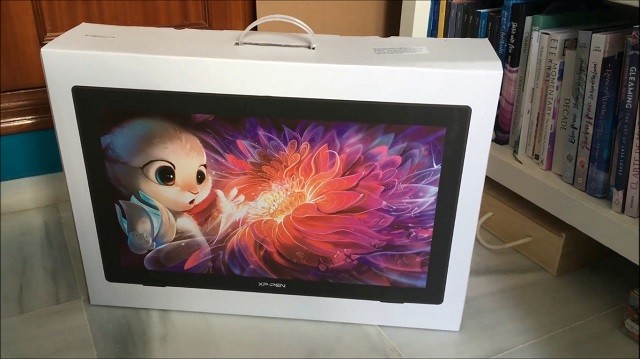
Unboxing
When you pick up the Artist 22 2nd Generation you get a decent box. The box immediately reveals that you need a decent desk to unpack, place and use the Artist 22 2nd Generation.
After opening it turns out to be mainly a lot of protective material, nevertheless a spacious workplace is recommended. The packaging contains the Display Stand , Power Adapter , drawing glove, the screen itself and a considerable number of connecting cables and the necessary installation and description materials.
Also in the box is a cylindrical holder, which contains the stylus and assorted replacement nibs. The holder’s top contains a pen stand, which you can use to keep your pen when it’s not being used.
Beauty and Brawn
This is a quality product with an elegant design. The hardware is impressive, and feels sturdy and durable. Very sturdy, in fact, which accounts for one of its biggest drawbacks: it’s very, very heavy.
There is a big drawing area with the Artist 22 2nd Generation which taking up too much desk space.
It’s not ideal for travelling with - if you do want something you could move around maybe go for 15.6 inch but this still wont be as flexible as an iPad Pro would be.
On the back of the units are the ports for the tablet and an adjustable stand. Along the top edge, in the center, is the power button. On the top right edge are controls for adjusting picture, color, brightness, and OSD (On-Screen-Display) parameters.
Cables are nicely tucked away to the side under a detachable cover . The stand is easy to adjust and offers a wide range of angles ( 16~90 degrees ). It can even act as a normal monitor set upright.
Just like the XP-Pen Artist 22R Pro , the back of the Artist 22 2nd Generation has mounting holes for a VESA 100mm compatible stand, so you could easily mount this display to an Ergotron Arm instead of using the official stand.
The build quality, resolution and pen response was indistinguishable from that of a Artist 22R Pro.
the biggest difference are that the newer 22 2nd Generation has no ExpressKeys built into the sides like the 22R Pro does.
Keep in mind you will need to get the XP-Pen ExpressKey remote as the tablet itself doesn’t have any buttons on it.
Screen Specs
The drawing tablet has a 22inch large screen ideal for artists working on it for hours and provides a large working area. It can be used by professionals to create animations, illustrations, and industrial designs.
The XP-Pen Artist 22 2nd Generation features a 1,920 x 1,080 full HD display with 800:1 contrast ratio, 86 per cent NTSC colour, 122 per cent sRGB and a 8ms response time.
It has an anti-glare film , making it ideal for sketching and drawing at any time, day or night. The surface felt very nice to draw on, giving a smooth-glass like feel.
At the color gamut of ≥90% Adobe RGB. For someone who’s using this for print it’s a ideal for accurate final colors.
The screen is not laminated. but the gap between the drawing surface and LCD beneath is minimal, and gap can only be seen when looking from the side, not from the front. so you slmost can’t notice the parallax.
The XP-Pen Artist 24 Pro model has a QHD 2560 x 1440 Monitor , This difference is definitely noticeable especially if you are used to working in such high resolution.
The Full HD Resolution screen can feel too low resolution for such a big screen at close distance. However it is something you start to not notice after using the product for a period of time.
Stylus Pen PA6
The PA6 digital pen don’t have batteries and are well balanced with a comfortable feel and never need to be charged. I have used to the fluid drawing experience that the EMR (Electro Magnetic Resonance) pens provide.
Please don’t forget the 8,000 plus levels of pen pressure to execute your painting prowess. It’s pressure sensitivity etc is incredible and a joy to use.
When in Photoshop, there are so many tools that take advantage of pressure sensitivity, that I can’t image drawing or retouching without one.
The 2-button, battery free stylus is very impressive . It is quite responsive, with very little lag. responds perfectly to movement/pressure.
The specs indicate that the pen has tilt sensitivity up to around 60 degrees. I don’t utilize pen tilt much in my digital painting technique, but I tried it briefly with an airbrush and it worked remarkably well.
The stylus moves very smoothly across the surface, and it is a joy to hold and to work with. Plus, I don’t ever have to worry about charging the stylus!
Start up
Assembly is a simple job, the connection itself is also quite obvious.
It uses an HDMI port, and supports USB-C to USB-C connection.
Powered up, the color range and brightness of the tablet are wonderful, the display is bright and sharp, and all of the colors are beautiful.
you can access and download the drivers on the XP-Pen official website . Since I already had the XP-Pen drivers on my PC, adding the Artist 22 2nd Generation to my system was a snap. I just plugged in the cables, turned the device on and it worked right away with no conflicts or drops in PC performance.
Commissioning software is not as obvious as the instruction suggests. To find out how to fine-tune my iMac and Artist 22 2nd Generation through the system preferences, I had to study XP-Pen’s instructional video on YouTube .
But once you have set the preferences in basic, the steering works very smoothly and the settings work well with you. I found the setup and ease of use on the Mac to be very good. Things worked for the most part.
If you’re used to a regular XP-Pen tablet, it runs fairly smoothly and you get excited about the extras that the Artist 22 2nd Generation brings in terms of control and software.
XP-Pen Artist 22 2nd Generation official website:https://www.xp-pen.com/product/855.html
Digital Painting Experience
I’m a graphic designer and it’s an awesome tool for illustrations and photo editing, and works great as secondary monitor for a laptop ( although I use an iMAC ). It’s nice that they included a stand.
The XP-Pen Artist 22 2nd Generation has worked flawlessly from day one, easy setup and registry, no dead pixels, and the pen performance and accuracy are spot on. The tablet can detect the presence of the pen a few cms from the screen.
The screen is great and has a matte film to make it feel like paper. The display itself is beautiful and the colour, contrast and sharpness is spot on. Awesome for digital drawings, sketches, portraits, etc.
I did calibration and at the top left and bottom right corner cursor aligns good. I tried to draw lines using a ruler and get the single straight line. All of them don’t have a little curved or wavy.
Another benefit of the larger screen is that you have much more work space to play with. My layers and tools menus are no longer in the way of the painting which allows me to channel all my focus on the work rather than having to pan constantly because of the menus which becomes rather cumbersome.
When I was painting in the examples below, adding the details on the Artist 22 2nd Generation makes you want to go on forever.you just get drawn into your work. It is getting ever so close to the experience of traditional painting and drawing.
I have used the XP-Pen tablet for years for digital art in Photoshop. I use Photoshop for some my renderings and drawings……some I like to have the sketch as the underly for the rendering or have the sketch over top of it for a more loose look and the line quality is being smoothly.
Photoshop’s pen/painting tools aren’t quite as robust as other art programs that are more designed from the ground up for smooth, natural tablet feel.
When I use Paint Tool SAI ( a great little Japanese program with no bloat, amazing tools and a low footprint) my inking lines are as smooth and defined as when I use a brush.
you can chose one out of three softwares ArtRage 5, openCanvas, or Cartoon Animator 4 which comes with Artist 22 2nd Generation product purchase. but notice that openCanvas 7 is not available for Mac system.
Free digital painting and illustration software options are becoming more available in recent years. Here are some great alternatives to Adobe Photoshop. Krita, MyPaint , GIMP, FireAlpaca & MediBang Paint ,Autodesk Sketchbook.... you can have a try with these.
If you’re one of those people who have a XP-Pen Deco or a Wacom Intuos or any other tablet without the screen I would highly recommend the XP-Pen Artist range. The hand eye coordination is so vital to the artist and the XP-Pen Artist offers that for you . however I wouldn’t suggest a beginner to go out and buy a Artist 22 2nd Generation but rather get confident using a Bamboo or an Intuos first then consider upgrading.
Conclusion
This is a very high quality product. Price-wise it is Affordable. The benefit of the super, large screen and sophisticated inclining stand completely outweighs its price tag ( $499.99 ).
The XP-Pen is a worthy contender of being the best budget graphics tablet out there. When you look at some of the competition coming in at well over one thousand dollars, you can see why this is such an appealing piece of kit.
I feel kind of excited having a much bigger digital workspace.Furthermore the level of engagement I have with my work just makes me want to draw on it all the time! I use this every day. I love the big display and ease of use. Overall, I am happy with the purchase.
I would of loved to had this XP-Pen Artist 22 2nd Generation to be 2K Resolution but that would be more expensive. I can honestly say that the Artist 22 2nd Generation has finally given me the drawing experience I’ve waited my whole life for. This is by far the best and the most comfortable experience that I ever had with a graphics tablet.
If you’ve ever coveted a full-size pen display but haven’t had the budget to make it a reality, the new Artist 22 2nd Generation could very well be the pen display you’ve been waiting for .
So if you are considering upgrading your tablet and you have a couple grand saved up , I say go for it! You won’t regret it!
コメントをみる |
XP-Pen Artist 24 Pro Creative Drawing Screen 24nch Review: The Ultimate Tool for Graphic Designers
2021年5月12日 趣味


Are you looking for a Wacom Cintiq digital drawing pad review? You may have just gotten lucky, because Cintiq is no longer the only option on the market. The XP-Pen Artist 24 Pro ( https://www.xp-pen.com/product/602.html ) is a budget alternative to the medium Cintiq, it’s a tablet that lets you draw directly on the surface and can also be used as a third monitor. Read on to find out the nitty-gritty details about this intuitive tablet.
XP-PEN kindly sent me the Artist 24 Pro display tablet to make a review! This is my first display tablet of this size and it’s huge. I’ve had to opportunity to use this tablet on-and-off over the course of the past several weeks, and while there were a few issues my overall impression is positive.
This tablet’s interactive display is reminiscent of Wacom’s Cintiq tablet at a fraction of the price. It works flawlessly in multiple graphics and editing programs. The impressive screen size leaves plenty of room for your most inventive ideas. Though a little bulkier than the competition, being able to draw directly on the screen makes it worth the weight trade-off.
If you want a cheaper alternative to a cintiq, the XP-Pen ( https://www.xp-pen.com ) Drawing Tablet Monitor is a good investment. At a fourth of the cost of a comparable cintiq, this pen display monitor is a great choice for people short of cash.
Unboxing
Apart from the 24” display tablet itself, the package comes with the usual cabling peripherals, plus some bonus extras. If your machine supports a USB-C connection for display, you’ll only need the one cable (plus the power connection). Otherwise, there’s a HDMI and a USB-C to USB converter included as well.
The extras include: an additional stylus, a one-size-fits-all artist’s glove, and a microfiber cloth.
The container for the stylus twists open to reveal 8 extra stylus nibs. Its cap can also be removed to use as a stylus holder.
Despite such weight, the adjustment stand is incredibly easy to use and I was changing the tablet’s position a few times during the day for the first couple of weeks just because I liked the process.
Driver (Installation & General Use)
There were a few issues with installation, mostly tied to interactions between the driver, Windows 10 and Windows Ink.
Initially, brush strokes were offset from the stylus’ point of contact with the screen by about 3-4 centimetres when attempting to draw in Photoshop CS6. Random straight strokes also occurred frequently. This same problem did not occur in MS Paint or Photoshop CC 2019. This was fixed by changing the UI scaling setting for the monitor in Windows settings from 125% (which was apparently the default) to 100%.
Initially, brush strokes had no pen pressure in Photoshop CC 2019. Photoshop CS6, on the other hand, did (but suffered from the previous offset problem). This was fixed by turning on the Windows Ink setting in the XP-Pen driver menu. So in other words: CC 2019 needs Windows Ink on to recognise pen pressure, while CS6 didn’t, but was affected by UI scaling.
Interestingly, if Windows Task Manager was in focus and Windows Ink was not enabled in driver settings, stylus input was not recognised at all. There may be other programs that have this issue, but this was the only one I encountered so far.
I will say that I’ve had many problems with Wacom drivers interacting badly with Windows Ink and other things in the past before, so these types of issues are not exclusive to the XP-Pen drivers.
I’m currently using driver version 3.0.5, a beta build that has a lovely UI; it’s clear and laid out well. I did also try version 1.6.4 initially, which was fine — the UI for that version was similar to the layout you find with Wacom drivers.
Apart from the issues during installation that required troubleshooting, I haven’t had many major complaints with the driver in day-to-day use, I do think that there are a few areas for improvement, however.
The driver stops working correctly each time the computer is set to sleep and woken up again. To fix this the driver must be exited from the system tray and then relaunched.
There also doesn’t seem to be a way to bind WIN+SHIFT+ARROW to any of the express keys. WIN+SHIFT+ARROW (left or right arrow) is the Windows shortcut to quickly move a focused window to another monitor, so it’s something I use a lot if I’m on a multi-monitor setup. Unfortunately, attempting to set this shortcut in the express keys menu will simply move the actual driver window over to the other monitor while the custom input is not properly recognised in the text field.
The driver does offer a “switch monitor” option for the express keys that when clicked will transfer your stylus input to another monitor, which is extremely useful.
Screen
At 24” with a 2560x1440p QHD resolution, images are sharp and crisp even when viewed from a close range while drawing. Genuinely, it feels great to paint on based off this aspect alone.
The colour temperature is set to 6500K by default in the the driver settings. I think initially it felt just a touch too saturated, but overall I’m fairly happy with the colour display.
The monitor has touch-sensitive inputs on the top right corner: a -/+ for quickly adjusting the brightness, a menu for further settings, and power. I found myself using these to adjust the brightness throughout the day frequently. The power input requires a few seconds of continued contact from your finger to react, which prevents you from accidentally brushing it and turning the monitor on/off.
The monitor comes with a built-in stand. I found it easy to adjust to different viewing angles and also incredibly sturdy. I had no problems leaning on the monitor while drawing.
The monitor also comes with a pre-applied anti-glare screen protector. I wasn’t bothered by it and it seems to be holding out well after several weeks of use. I think the screen itself definitely needs the additional anti-glare, as being a display tablet means that it’s significantly more reflective than my main display.
I think that the screen protector also has some oil resistance thing, because even though I wasn’t using the glove that comes with the tablet - it still remains quite clean. It also makes the drawing process very comfortable, providing a paper-like feel.
I highly recommend calibrating the tablet before use with the original software. It’s very easy to do and makes the drawing process very easy and comfortable. When I received the tablet, I was afraid that it would have a big gap between stylus and display, as most tablets of this type do, but Artist 24 Pro is very precise and it’s a great pleasure to draw with it!
Stylus
My first impression of the stylus was that it’s lighter in comparison to the Wacom styluses that I’m used to — there is very little to no weighting on the back end of the stylus, which makes it feel noticeably different when gripped. To be honest, though, I forgot about it when I was actually painting. Still, I would prefer a bit more weighting because I do think it makes the stylus more comfortable to hold overall for long periods of time.
There’s also no eraser nib, but I’ve personally never used those on Wacom tablets (I always use shortcuts to switch between brush and eraser instead) so this was a non-issue for me.
The two shortcut buttons on the side of the stylus sit quite flat to the surface, so I think they would be less likely to bother people who don’t use them. I use them a lot, however, and found that they were still easy to click despite being quite flat.
The buttons seem to otherwise work completely fine for any other functions that don’t require the stylus to send two simultaneous messages, so unless you’re like me and like to bind “alt” to a stylus trigger, this won’t affect you.
Pen Pressure & Activation Force
Most current-gen tablets flash a big number for the pen pressure levels as a selling point. Having used tablets with 512, 2k, 4k and 8k levels of pressure sensitivity, I’d say I noticed the biggest difference when switching from 512 to 2k, but in my opinion beyond 2k the change is minimal and has no real impact on the way I draw.
The XP-Pen Artist Pro 24 comes with 8192 levels of sensitivty, which is a very big number, but in practical application all I can say is that it works the way I expect it to and I don’t have any complaints regarding the transition between pressure levels on the default linear pressure curve.
More importantly I did notice that the IAF (initial activation force) was not as low as I would have liked. Very light input is not recognised, or only partially recognised before dropping off and on again. In a practical sense this doesn’t actually impact me through most of (perhaps 97%) of the painting process, but it did give me pause once in a while when I wanted to make a really light stroke and had to adjust my method.
The drivers for this tablet do come with a pressure curve you can adjust to your preferences, so this can help a little, although after some tests I preferred to leave mine on the default setting.
Digital Art Landscape Painting Step By Step Using Sketchbook With XP-Pen ARTIST 24 PRO By me
Summary of Drawing Experience
I think the mark of a good tool or piece of hardware is that it does not draw attention to itself during the course of its use. An ideal drawing experience allows me to be fully immersed in the act of drawing without having my focus shifted to dealing with the tool. With this in mind the XP-Pen Artist Pro performed very well for the most part, but was held back by a couple of issues.
Pros:
The monitor resolution honestly feels great to look at; the pixel density means that I can basically forget about pixels even with my face positioned closer to the screen.
The parallax between the tip of the stylus and the actual position of input was very minimal and basically not noticeable for me, especially after the simple calibration process offered by the driver.
At normal room temperature (say up to about mid-20’s celsius) the monitor screen stays impressively cool to the touch and I was never bothered by resting my drawing hand on its surface even when painting for long sessions.
The 20 express keys and 2 roller rings are extremely helpful and I actually found myself using all of them, despite initially thinking that I’d only need half of them. The keys are also comfortable and responsive to click (which sounds like it should obviously be so, but having used some Intuos iterations in the past which had some very annoying-to-click express keys, I don’t take this feature for granted anymore).
Cons:
The driver needs to be restarted everytime the computer wakes from sleep in order to work.
Higher IAF was noticeable when very light strokes were desirable. Also, the input will on rare occasions glitch by performing a completely straight max opacity + max brush size stroke. This seemed to happen primarily when I was trying to get light strokes to register.
The issue with eyedropping using “alt” mapped to a stylus trigger as detailed above. Quite unlucky for someone like me who has over a decade of muscle memory for this particular mapping.
Overall, as I said at the beginning, my impression of the tablet is positive. While I think it has room for improvement when it comes to driver performance and the initial activation force especially, it also has a lot to offer at a highly competitive price point ($900USD at retail), and it would’ve been amazing if something like this had been available to me back when I first started digital painting. As I do enjoy using it for the most part I’ll probably continue to use it in future.
コメントをみる |